
Tiles in your App
Leaflet
Raster Layer Example
In Leaflet, a tile layer is a layer that displays map tiles using pre-rendered imagery or vector data. A tile layer in Leaflet is made up of multiple square tiles that are arranged in a grid to cover the entire map area. Leaflet tile layers can be customized with different styles, colors, and labels to provide a unique look and feel for maps. This can be done using CSS, JavaScript, or other styling techniques. One of the key advantages of using Leaflet tile layers is that they are lightweight and can be easily integrated into web applications, resulting in fast and responsive maps even on slower connections.
To add raster tiles to a Leaflet map:
L.tileLayer(
  'https://tiles.regrid.com/api/v1/parcels/{z}/{x}/{y}.png?token=<token>'
).addTo(map)
Leaflet vector layer plug-ins
Leaflet 0.7 and 1.x support mapbox vector tiles via plugins.
Mapbox GL JS
A Mapbox tile layer is made up of multiple square tiles, which are arranged in a grid to cover the entire map area. Each tile represents a small portion of the map and includes pre-rendered imagery or vector data that is styled and labeled according to the chosen map style.
<html>
  <head>
    <script
    src="https://code.jquery.com/jquery-3.4.1.min.js"
    integrity="sha256-CSXorXvZcTkaix6Yvo6HppcZGetbYMGWSFlBw8HfCJo="
    crossorigin="anonymous"></script>
    <script src='https://api.tiles.mapbox.com/mapbox-gl-js/v1.2.1/mapbox-gl.js'></script>
    <link href='https://api.tiles.mapbox.com/mapbox-gl-js/v1.2.1/mapbox-gl.css' rel='stylesheet' />
    <style>
      body, #map {
        height: 100vh;
        width: 100vw;
      }
    </style>
  </head>

  <body>
    <div id="map"></div>

    <script>
      var url = 'https://tiles.regrid.com'
      mapboxgl.accessToken = 'pk.'; // Insert your Mapbox token here
      var map = new mapboxgl.Map({
        container: 'map',
        style: 'mapbox://styles/mapbox/light-v9',
        zoom: 15,
        center: [-83.139981, 42.398763],
        showTileBoundaries: true
      });
      map.showTileBoundaries = true;

      map.on('load', function () {
        // Create a parcel layer
        var parcelCreate = $.ajax({
          url: url + '/api/v1/parcels?format=mvt&token=',
          type: 'GET',
          contentType: 'application/json',
          dataType: 'json'
        });
        parcelCreate.fail(function(jqXHR, textStatus, errorThrown) {
          console.log('Error getting parcel layer', jqXHR, textStatus, errorThrown);
        });

        $.when(parcelCreate).then(setup);

        function setup(layerData) {
          var data = layerData;
          console.log('Got parcel layer', layerData);

          // Register the parcel source using the tile URL we just got
          map.addSource(data.id, {
            type: 'vector',
            tiles: data.tiles
          });

          // Add basic parcel outlines
          map.addLayer({
            'id': 'parcels',
            'type': 'line',
            'source': data.id,
            'source-layer': data.id,
            'minzoom': 13,
            'maxzoom': 20,
            layout: {
              visibility: 'visible'
            },
            'paint': {
              'line-color': '#649d8d'
            }
          });
        };
      });
    </script>
  </body>
</html>
ArcGIS Online (AGOL)
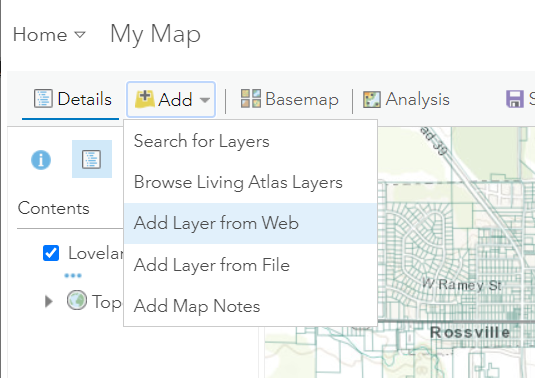
ArcGISOnline TiledLayer works with our raster tile layer, but the {z}/{x}/{y} of our urls needs to be changed to the literal text string that looks like this: {level}/{col}/{row}
You literally leave those level, col, and row words in there instead of the z,x,y our TileJson returns in URLs:
AGSWebTiledLayer(urlTemplate: "[https://tiles.regrid.com/api/v1/parcels/\{level}/\{col}/\{row}.png?token=](https://tiles.regrid.com/api/v1/parcels/\{level}/\{col}/\{row}.png?token=)
ArcGIS Desktop
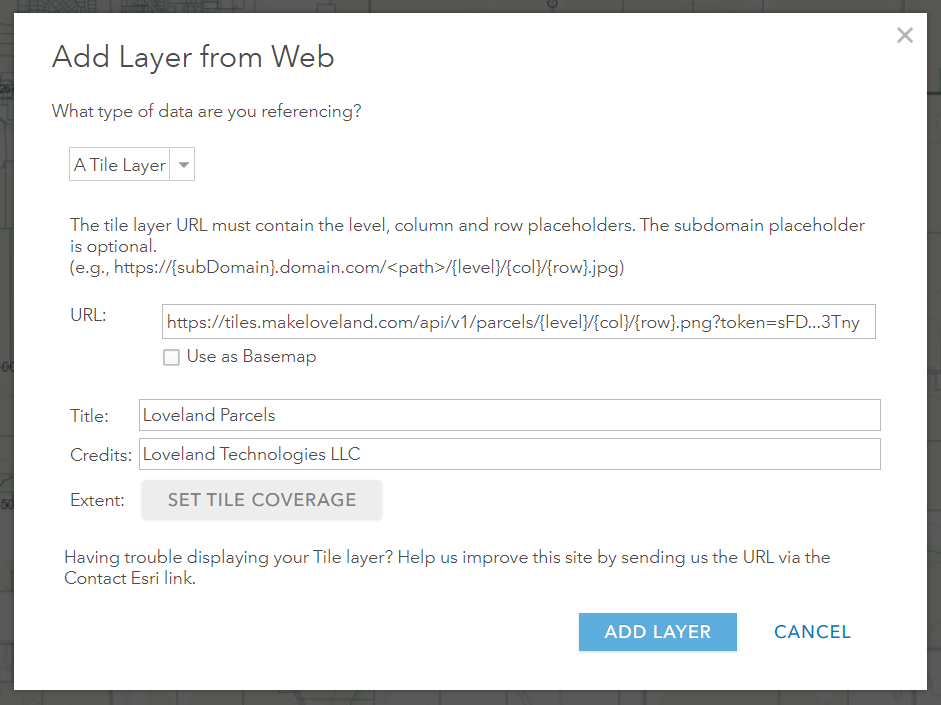
ArcGIS Desktop products only support Esri based vector tile layers. However, ArcGIS Desktop users can also use our raster tiles for integrations using the same template as ArcGIS Online:
[https://tiles.regrid.com/api/v1/parcels/\{level}/\{col}/\{row}.png?token=](https://tiles.regrid.com/api/v1/parcels/\{level}/\{col}/\{row}.png?token=)
ArcGIS Pro
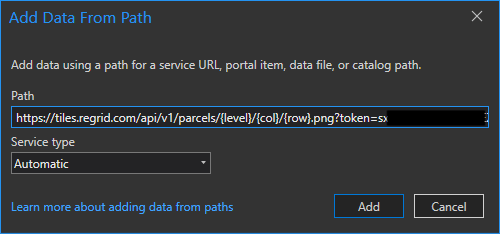
ArcGIS Pro products only support Esri based vector tile layers. However, ArcGIS Pro users can also use our raster tiles for integrations using the same template as ArcGIS Online:
[https://tiles.regrid.com/api/v1/parcels/\{level}/\{col}/\{row}.png?token=](https://tiles.regrid.com/api/v1/parcels/\{level}/\{col}/\{row}.png?token=)
- Navigate to Add Data
- Add Data from Path
- Enter the URL plus adding your token
- Keep layer type as 'Automatic'
Google Maps
Google maps primarily supports raster layers. This snippet uses jQuery to fetch details from the Regrid tileserver, then formats the parcel URL in the format that Google Maps expects.
loadParcelLayer();

// Get the information we need to add a PNG parcel layer to the map
function loadParcelLayer() {
  var parcelCreate = $.ajax({
    url: 'https://tiles.regrid.com/api/v1/parcels?format=png&token=',
    type: 'GET',
    contentType: 'application/json',
    dataType: 'json'
  });
  parcelCreate.fail(function(jqXHR, textStatus, errorThrown) {
    console.log('Error getting parcel layer', jqXHR, textStatus, errorThrown);
  });

  $.when(parcelCreate).then(setupParcels);
}

// Add the parcel data to the Google Map
function setupParcels(layerData) {
  console.log("Got this layer data from Regrid's servers", layerData);

  var imageMapType = new google.maps.ImageMapType({
    getTileUrl: function(coord, zoom) {
      var tileUrl = layerData.tiles[0];
      tileUrl = tileUrl.replace('{z}', zoom);
      tileUrl = tileUrl.replace('{x}', coord.x);
      tileUrl = tileUrl.replace('{y}', coord.y);

      return tileUrl
    },
    tileSize: new google.maps.Size(256, 256)
  });

  map.overlayMapTypes.push(imageMapType);
}
Updated 5 months ago